¶ Roles
There are more than 20 different permissions that form access rights, so for ease of use, they are bundled into sets of rights — roles. At the end of the day, it is the role (predefined or custom) that applies to the universe/project/task for groups and individual users.
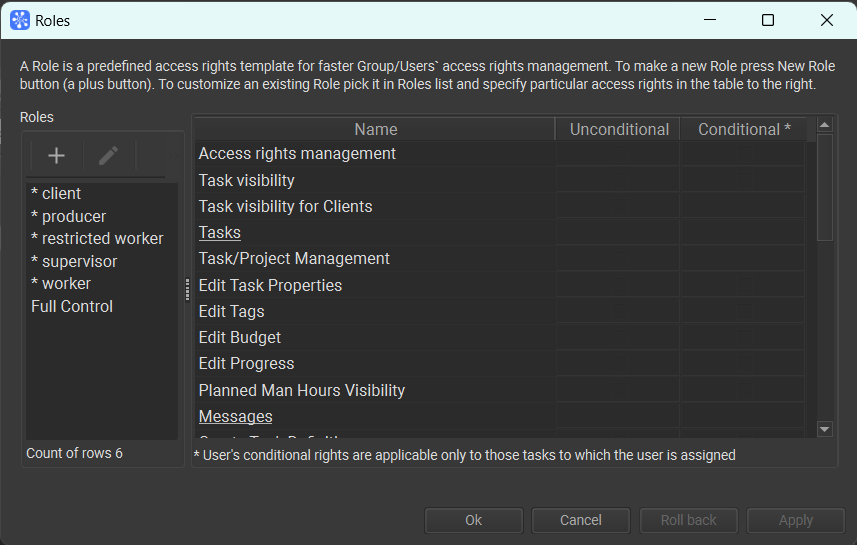
There are several predefined roles in Cerebro, which differ by access level. You can view the set of role permissions in Cerebro in the edit role permissions window:
-
Full control — full control over tasks and subtasks: creating subtasks, deleting, changing their properties and assignees, writing messages of any type, etc. Being applied at the universe level, this role grants access to all Administrator’s functions: add/delete users, create new projects, etc. This role is forbidden to edit, as the system needs at least one user at any time that has full access to it;
-
Producer — role designed for a financial manager. It grants access to budgeting and salaries;
-
Supervisor — the role grants the widest options to manage tasks and their properties, practically, unlimited access in this scope, except several minor features (e.g., to create Client’s Reviews);
-
Client — a special role for the team’s outsiders (e.g., clients). It enables the option to create messages of a special type — Client’s Reviews but limits the visibility of other messages to those only that are marked as Visible for clients;
-
Worker — a role for the most part of the employees. It enables the options to create Reports and Notes and adjust the Task Progress value up to 99%, but not to set it Done;
-
Restricted Worker — a role for team members with restricted access to project data (e.g., freelancers). It enables the option to see and operate only on tasks where the Restricted Worker is an assignee. Within this scope, the access level of the Restricted Worker is equal to the one of an ordinary Worker.
If you need to create a custom role, it can be done in the Roles window, which is accessible from Access Rights window of any object (F.ex task Properties — Manage Access Rights — Roles..).

This window displays current permissions for the roles, and it also allows you to create, edit or delete them.
On the left side, there is a list of roles existing in the system. The Full Control role is protected from editing or deletion.
Оn the right side — the list of permissions for the selected role. The list consists of three columns:
- Name — the permission’s name;
- Unconventional — an option to enable the permission without any conditions;
- Conditional — an option for a permission to take effect only when the user is assigned.
If you hover the mouse cursor over the name of the permission, a tooltip with its description appears.
¶ Creating a New Role
A new role is never created ‘from scratch’, you need to pick one of the existing roles to serve as a template for the new one. So, first, pick one of the existing roles and press the New role button (above the list of roles).
After that, you can specify the name for the new role and edit its permissions on the right side of the window.
¶ Editing a Role
To set/edit a role name, double click its name or use the Rename button above it.
There are two columns with checkboxes on the right side of the Roles window — Unconditional and Conditional. You can configure the particular permission set for the role by checking/unchecking the boxes. Each permission may have only one option selected - either unconditional or conditional (if applicable).
If you change a permission set for the role that has already been in use in your universe, the changes will affect all groups/users that are allocated to the role.
Some permissions are logically related to each other. For example, if you switch on the Task management permission for a certain role, it makes sense to activate the Task Editing and New Task Creation permissions as well, as they are all needed for full control over the tasks.
¶ Deleting a Role
Pick a role in the list and press either the Delete Role button in the interface or the Delete button on your keyboard.
If the role being deleted is in use in your universe, it will not affect the users/groups that have been allocated to it. That is, the deletion just removes the item from the list. If you want to discard permissions for the users/groups associated with the deleted role, you need to do it manually in the access settings for the corresponding objects.
Any change (creating or editing a role) must be confirmed by pressing Confirm or OK button. If you want to discard the changes, press a Roll Back or Cancel.
While you are making changes to the roles, the lower part of the window displays comments on how the change will affect the role or, in certain cases, why the change is impossible to make this way.